

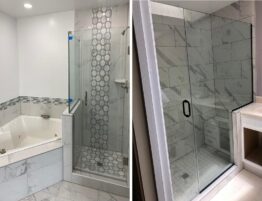
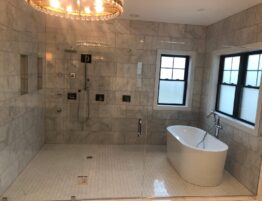
A frameless glass shower door is one of the most elegant upgrades you can make to a bathroom. Its sleek design creates a modern, open appearance while showcasing beautiful tile work and making the space feel larger. However, installing a frameless glass shower door on tile requires precision, proper tools, and careful planning to ensure a secure and long-lasting installation.
Whether you are a professional contractor or an experienced DIY enthusiast, understanding the correct installation process is essential. This guide explains how to install a frameless glass shower door on tile safely and effectively while achieving a professional-quality finish.
Why Choose a Frameless Glass Shower Door?
Before diving into the installation process, it is important to understand why frameless shower doors have become increasingly popular.
Modern Aesthetic Appeal
Unlike traditional framed shower doors, frameless designs offer a clean and minimalist appearance. The absence of bulky metal frames allows the beauty of your tile and bathroom fixtures to stand out.
Enhanced Durability
Most frameless shower doors are constructed from tempered safety glass, typically 3/8-inch to 1/2-inch thick. This durable glass provides excellent strength and longevity.
Easy Maintenance
Without metal frames that can collect moisture and soap scum, frameless shower doors are easier to clean and maintain.
Increased Property Value
A well-installed frameless glass shower door can enhance the overall value and appeal of your home, especially in modern bathroom renovations.
Tools and Materials Needed For Installation
Before beginning installation, gather the following tools and materials:
- Frameless glass shower door kit
- Measuring tape
- Level
- Drill with diamond-tipped tile drill bits
- Screwdriver
- Silicone sealant
- Masking tape
- Pencil or marker
- Safety glasses
- Gloves
- Rubber mallet
- Anchors and mounting hardware
- Shims
Having all materials ready beforehand helps ensure a smooth installation process.
Step 1: Measure the Shower Opening
Accurate measurements are the foundation of a successful installation.
Measure:
- Width of the shower opening
- Height from the shower curb to the top
- Any variations in wall alignment
- Tile thickness and surface condition
Take measurements at multiple points because shower walls may not be perfectly plumb. Most frameless shower door manufacturers require precise measurements to fabricate the glass correctly.
Double-check every measurement before ordering or installing the glass panel.
Step 2: Inspect the Tile Surface
The tile surface must be stable and properly installed before attaching any hardware.
Inspect for:
- Loose tiles
- Cracks
- Uneven surfaces
- Water damage behind the tile
Repair any damaged areas before proceeding. Mounting hardware attached to compromised tile can eventually loosen and create safety hazards.
Step 3: Mark the Hardware Locations
Once the measurements are confirmed, position the mounting channels or hinges according to the manufacturer’s instructions.
Use a level to ensure everything is perfectly vertical and aligned.
Mark:
- Hinge locations
- Wall bracket positions
- Bottom guide placements
- Mounting screw locations
Apply masking tape over the tile where drilling will occur. The tape helps prevent drill bits from slipping and reduces the risk of tile chipping.
Step 4: Drill Through the Tile
Drilling into tile requires patience and the correct tools.
Tips for Drilling Tile
- Use a diamond-tipped or carbide-tipped drill bit.
- Begin drilling at a slow speed.
- Apply light pressure.
- Keep the drill perpendicular to the tile surface.
- Periodically cool the drill bit with water to reduce heat buildup.
Carefully drill each marked hole to the required depth.
Avoid rushing this step, as cracked tiles can be expensive and time-consuming to replace.
Step 5: Install Wall Anchors and Mounting Hardware
After drilling, remove any dust or debris from the holes.
Insert the recommended wall anchors if required. Anchors provide additional support and help secure the hardware firmly.
Attach:
- Wall channels
- Hinges
- Mounting brackets
Use a level again to verify alignment before fully tightening screws.
Even slight misalignment can affect the operation of the shower door and compromise its appearance.
Step 6: Position the Fixed Glass Panel
Many frameless shower systems include one or more fixed glass panels.
With assistance from another person, carefully lift and position the glass panel into the mounting channel or brackets.
Because tempered glass is heavy and fragile at the edges, always handle it with care.
Use shims where necessary to:
- Maintain proper spacing
- Ensure plumb alignment
- Prevent direct glass-to-tile contact
Secure the panel according to the manufacturer’s specifications.
Step 7: Install the Door Panel
The door panel is typically the heaviest component of the installation.
With the help of a partner:
- Lift the door carefully.
- Align it with the installed hinges.
- Secure the hinge clamps to the glass.
- Verify smooth movement.
Most frameless shower doors should open and close effortlessly without dragging or rubbing against the tile.
Adjust the hinges as needed until the door is perfectly aligned.
Step 8: Install Door Seals and Sweep
Door seals play a crucial role in preventing water leakage.
Install:
- Bottom door sweep
- Vertical seals
- Magnetic closure strips if included
Ensure all seals fit snugly without restricting door movement.
Proper sealing helps maintain a dry bathroom floor and protects surrounding surfaces from water damage.
Step 9: Apply Silicone Sealant
High-quality silicone sealant creates a waterproof barrier around the shower enclosure.
Apply a continuous bead of clear silicone:
- Along the outside edges of wall channels
- Around fixed panel bases
- Along the shower curb
Avoid applying silicone on the interior side of channels unless specified by the manufacturer.
Smooth the sealant with a finishing tool or damp finger for a clean appearance.
Allow the silicone to cure fully according to product instructions, typically 24 to 48 hours.
Step 10: Perform Final Adjustments
Before using the shower, inspect the entire installation carefully.
Check for:
- Proper door alignment
- Smooth opening and closing
- Secure hardware
- Uniform gaps
- Water-tight seals
Tighten any loose hardware and make minor hinge adjustments if necessary.
A final inspection helps ensure both safety and long-term performance.
Common Installation Mistakes to Avoid
Inaccurate Measurements
Incorrect measurements can result in improperly fitting glass panels and costly replacements.
Drilling Too Quickly
Fast drilling generates heat and increases the risk of cracking tile surfaces.
Ignoring Wall Alignment
Even slightly out-of-plumb walls can affect door operation and appearance.
Over-Tightening Hardware
Excessive tightening can place stress on the glass and increase the likelihood of damage.
Skipping Sealant
Proper waterproofing is essential to prevent leaks and water damage.
Safety Considerations
Frameless shower doors are made from heavy tempered glass and should always be handled carefully.
Safety recommendations include:
- Wearing protective gloves
- Using safety glasses
- Having at least one helper during installation
- Following manufacturer guidelines
- Never placing glass directly on hard surfaces without protection
Professional installation may be advisable for larger or custom-designed shower enclosures.
Maintenance After Installation
Proper maintenance helps preserve the appearance and functionality of your frameless shower door.
Clean Regularly
Use non-abrasive glass cleaners and a microfiber cloth to prevent buildup.
Squeegee After Use
Removing excess water reduces spotting and mineral deposits.
Inspect Hardware
Periodically check hinges, brackets, and handles for tightness.
Reapply Sealant When Needed
Over time, silicone may deteriorate and require replacement to maintain waterproof protection.
Conclusion
Installing a frameless glass shower door on tile can dramatically enhance the appearance and value of your bathroom. While the process requires careful planning, accurate measurements, and attention to detail, following the correct installation steps can lead to outstanding results.
From measuring the shower opening and drilling tile safely to mounting the glass panels and sealing the enclosure, each step plays an important role in creating a secure and attractive shower system. Whether you choose to tackle the project yourself or hire a professional, understanding the installation process ensures your frameless glass shower door will provide years of beauty, durability, and reliable performance.


